How to Connect a MikroTik Router Without a Public IP Using ISPbills SSTP VPN
Connect a MikroTik router behind NAT or CGNAT using its ISPbills SSTP VPN account, then verify the tunnel, register its VPN address and check API access.
Connect a MikroTik router behind NAT or CGNAT using its ISPbills SSTP VPN account, then verify the tunnel, register its VPN address and check API access.
If your MikroTik router does not have a directly reachable public IP, connecting it to an ISP management platform can be difficult.
This is especially common when the router is:
- Behind carrier-grade NAT (CGNAT).
- Behind another NAT router.
- Using a changing public IP that complicates a fixed management destination.
- Installed at a branch or remote site with only private addressing.
The router may have internet access without being directly reachable from an external management system. A dynamic public IP is not automatically unreachable, however, and should not be confused with a private address.
ISPbills provides a VPN Account feature for this situation. The MikroTik establishes an outbound SSTP VPN tunnel to an ISPbills-provided endpoint. Once connected, ISPbills can use the router’s VPN-assigned address to communicate with its API.
This guide focuses on IPv4 NAT/CGNAT and the ISPbills-managed SSTP workflow. It explains the networking model, account-specific setup, and verification—not how to build an independent VPN server. A running tunnel does not automatically enable every router service or ISPbills feature.
How ISPbills VPN Accounts solve the problem
Your MikroTik starts an outbound SSTP connection to an ISPbills-provided VPN endpoint. ISPbills can then reach the router through its VPN-assigned address, even behind NAT or CGNAT.
Use that address and the router’s MikroTik API credentials when registering it. Working internet, a connected tunnel and permitted API access are still required. See the VPN Accounts documentation.
When do you need an ISPbills VPN Account?
The following summarizes the documented ISPbills guidance:
| Router connectivity | ISPbills VPN Account guidance |
|---|---|
| Static public IP directly reachable from ISPbills | Not required. |
| Dynamic public IP | Use the documented VPN workflow. |
| Behind NAT or CGNAT | Use the documented VPN workflow when direct access is unavailable. |
| Private network or remote branch | Use the documented VPN workflow when direct access is unavailable. |
This is product workflow guidance, not a claim that every dynamic public IP is technically unreachable.
ISPbills specifies one VPN Account per router.
Step 1: Create a VPN Account in ISPbills
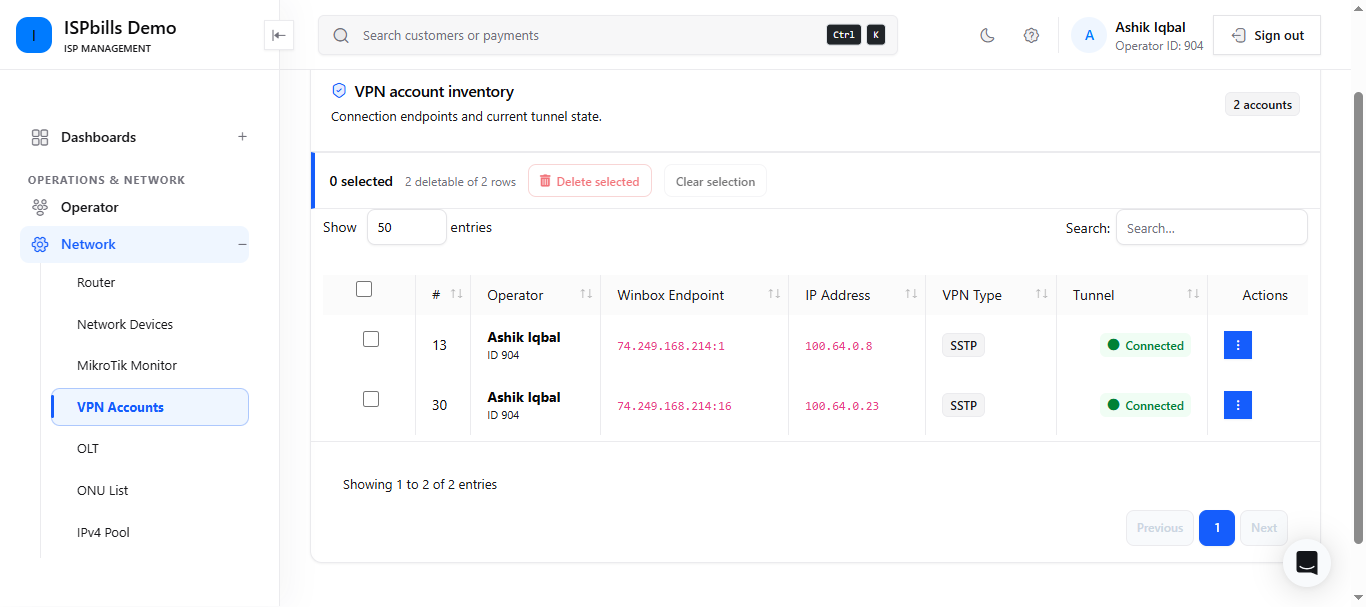
Open Routers & Packages → VPN Accounts, select New Account, then Create Account.
ISPbills documents that the account provides:
- A VPN IP address for router registration.
- A separate WinBox IP and port for remote access.
- VPN credentials.
- An account-specific configuration page.
VPN Accounts have no additional VPN account fee. Other ISPbills products and subscription charges are separate.
Keep the configuration private
The generated configuration contains credentials used to establish the tunnel. Do not publish it or share screenshots containing VPN passwords, API credentials, tokens, or other secrets.
Step 2: Open the VPN configuration
For an existing account, select Actions → Configuration. Older guides may call this Config Info.
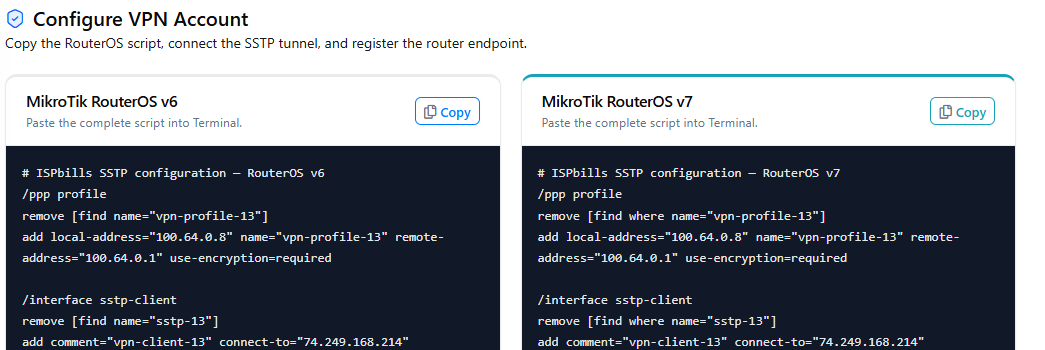
The current VPN documentation describes separate panels for:
- MikroTik RouterOS v6
- MikroTik RouterOS v7
Check the installed version before selecting the panel:
/system/resource/print
This shows the installed RouterOS version and device resources. It does not upgrade the router or establish compatibility with every account-script version. See MikroTik Resource.
Step 3: Copy and apply the ISPbills-generated configuration
Select the matching RouterOS panel and click Copy. Review the complete account-specific script, including the endpoint, certificate-related settings, and any routing or firewall changes.
Use the complete script from your own VPN account and the panel matching your RouterOS version; do not substitute a generic SSTP configuration.
The ISPbills VPN guide specifically describes an SSTP client and instructs users not to substitute a generic PPTP, L2TP, or WireGuard recipe.
Run the copied script in MikroTik New Terminal and wait for SSTP to connect.
Step 4: Register the MikroTik in ISPbills
After the SSTP tunnel connects, copy Router IP for ISPbills from the VPN account configuration and click Add Router. Use that address in the router’s IP Address field.
Do not enter:
- The MikroTik’s LAN address.
- Its private WAN or previous public address.
- The VPN server’s address.
- The separate Winbox Endpoint.
The VPN address is the registration destination for this workflow.
Step 5: Enter the MikroTik API credentials and verify access
Enter the VPN-assigned IP address, the router’s actual API port, and its MikroTik management credentials. Follow the current ISPbills VPN Accounts documentation to complete registration. If the form differs or an option such as Overwrite PPP Comment is unclear, confirm its effect with ISPbills support before submitting.
Submit using the current ISPbills interface, then verify API connectivity.
Understanding the two addresses
| Value | Use |
|---|---|
| Router IP for ISPbills | The router’s VPN-assigned address used in Add Router. |
| Winbox Endpoint | The separate address and port supplied for remote WinBox access. |
In short:
- Add Router: Router IP for ISPbills.
- WinBox: Winbox Endpoint.
Do not interchange them.
Step 6: Access the MikroTik remotely with WinBox
According to the VPN Accounts documentation:
- Open the VPN Accounts list.
- Find the router’s account.
- Copy Winbox Endpoint.
- Enter its supplied address and port in WinBox exactly as displayed.
ISPbills requires the MikroTik’s router-side WinBox service port to remain 8291 for this preconfigured workflow.
The external endpoint can use a different port. Do not replace its displayed port with 8291 merely because 8291 is the router-side requirement.
Retaining that service port does not mean allowing unrestricted WAN access. Verify remote WinBox separately from API connectivity and apply the supported access controls. See MikroTik WinBox.
You do not need another VPN server
For the documented standalone ISPbills VPN workflow, ISPbills manages the server and address allocation.
Its documentation states that standalone VPN mode uses the SSTP tunnel directly and requires no legacy server-subnet NAT or static route.
Do not interpret this as permission to delete existing routes or NAT rules used by other services.
Keep routing intentional
For a management-focused deployment, preserve the intended paths for ordinary internet and subscriber traffic. Do not assume every generated configuration is management-only.
RouterOS exposes an SSTP add-default-route option. Inspect the applied settings and compare routes before and after configuration:
/ip/route/print
Check active destinations, gateways, and the default route. This is an IPv4 route listing, not proof of end-to-end connectivity or a complete assessment of policy routing, additional tables, or IPv6. See MikroTik IP Routing.
Security: a VPN does not replace firewall policy
The VPN provides a path. Access controls determine who can use it.
A running SSTP tunnel does not automatically enable API, WinBox, SSH, or WebFig. The router still needs appropriate firewall, service, and account controls.
Service-level source restrictions are not the same as firewall filtering. A service may accept a TCP connection and then deny access; firewall rules can block traffic before it reaches the service.
Follow MikroTik’s hardening guidance:
- Use strong, unique credentials and appropriate permissions.
- Permit only required management access from approved sources.
- Keep unused services unavailable without disabling services needed by the integration.
- Keep RouterOS updated through an approved maintenance process.
- Monitor connection and authentication logs.
- Preserve an authorized recovery path when changing access controls.
Do not troubleshoot a VPN failure by opening API, API-SSL, WinBox, SSH, or WebFig to the entire internet.
Troubleshooting checklist
| Problem | What to check | Recommended action |
|---|---|---|
| SSTP does not connect | Client state, connection logs, internet access, supplied endpoint and port, and DNS if a hostname is used. | Restore the required outbound path and confirm that the correct account/version script was applied. |
| VPN authentication fails | Account configuration and authentication errors. | Use the correct VPN credentials; do not substitute the MikroTik API login. |
| Certificate validation fails | Router time, validity dates, issuer trust, expected server identity, and applied verification settings. | Resolve the certificate or trust issue. Do not disable verification to make the connection succeed. |
| Expected VPN address is absent | Relevant tunnel interface and Router IP for ISPbills. | Resolve the mismatch before registration; do not guess an address. |
| Tunnel runs but ISPbills cannot connect | Registration IP, API enablement and port, firewall/service restrictions, and user permissions. | Correct the failing layer rather than automatically rebuilding the tunnel. |
| API-SSL fails | Supported client TLS settings, API-SSL service, and certificate/trust configuration. | Confirm the supported setup; a port change alone is insufficient. |
| WinBox fails | Tunnel state, supplied Winbox Endpoint, router-side port 8291, and access restrictions. | Use the endpoint exactly as displayed and resolve the specific service or policy issue. |
| Ordinary internet traffic changes | Before/after routes and the active default route. | Correct only the confirmed unintended change through the approved change process. |
| API works but subscriber operations fail | Subsequent router/RADIUS configuration and operation permissions. | Verify that integration stage separately. |
Use ISPbills technical support or submit a support request with the installed RouterOS version and redacted evidence.
Common mistakes
| Mistake | Correct approach |
|---|---|
| Entering the LAN/WAN IP into Add Router | Use Router IP for ISPbills from the account. |
| Using Winbox Endpoint as the registration IP | Keep the API registration address and remote WinBox endpoint separate. |
| Using the VPN password as the API password | Supply the MikroTik management account’s credentials for API access. |
| Changing the router-side WinBox port | Retain 8291 for the documented ISPbills remote WinBox workflow. |
| Combining random SSTP tutorials | Use the complete account-specific configuration for the matching RouterOS version. |
| Sharing one VPN Account across routers | Create one VPN Account per router. |
Production deployment checklist
- The router has working internet access to the supplied VPN endpoint and port.
- DNS works if the endpoint uses a hostname.
- The matching RouterOS v6/v7 panel was selected.
- The complete account-specific configuration was reviewed and applied.
- Server-certificate trust and identity verification were checked.
- The intended SSTP interface is running.
- Its assigned router address matches Router IP for ISPbills.
- Add Router uses that VPN IP, the actual API port, and MikroTik management credentials.
- API connectivity and permissions are verified.
- API-SSL settings are confirmed if that service is used.
- Required routing preserves intended internet and subscriber traffic.
- Firewall and service restrictions permit only required management access.
- Remote WinBox is verified separately if needed, with router-side port 8291 unchanged.
- Required router/RADIUS configuration is complete.
- VPN and API credentials are stored securely and omitted from public screenshots.
- RouterOS maintenance, recovery, and log monitoring are in place.
Frequently Asked Questions
Can I connect a MikroTik to ISPbills without a public IP?
Yes. ISPbills documents VPN Accounts for routers that cannot be directly reached using a suitable public IP. The router establishes the outbound tunnel; management still requires working API access and appropriate controls.
Does the MikroTik need a static public IP?
Not for the documented VPN workflow. It needs working internet access and reachability to the supplied VPN endpoint.
Does ISPbills use SSTP for this workflow?
Yes. The VPN Accounts documentation describes an account-specific SSTP client configuration for MikroTik.
Does SSTP always use TCP 443?
TCP 443 is MikroTik’s default, but the SSTP port is configurable. Use the actual account-supplied endpoint and port.
Can I use PPTP, L2TP, or WireGuard instead?
Do not substitute a generic alternative into this documented workflow. ISPbills directs users to the generated SSTP configuration. Generic RouterOS support for another protocol does not establish ISPbills integration support.
How many routers can use one VPN Account?
ISPbills documents one VPN Account per router.
Is the VPN Account free?
The documentation states that there is no additional VPN account fee. Other ISPbills products and subscription charges are separate.
Which IP should I enter when adding the router?
Use Router IP for ISPbills, the assigned VPN address. Do not use the LAN/WAN address, VPN server address, or Winbox Endpoint.
Can I use WinBox without a public IP?
ISPbills documents a separate Winbox Endpoint for this purpose. Use its displayed address and port, with the tunnel and required service/access controls working.
What happens if I change the WinBox port?
ISPbills warns that changing the router’s default WinBox port 8291 breaks its preconfigured remote WinBox access. This requirement does not mean you should expose that port to every internet source.
Does a running tunnel mean subscriber services are configured?
No. Verify API connectivity and then complete the required router/RADIUS configuration separately.
Final thoughts
A lack of a directly reachable public IP does not necessarily prevent centralized MikroTik management. The key change is to let the router establish an outbound connection rather than relying on unsolicited inbound access through NAT or CGNAT.
For ISPbills, follow this sequence:
Create VPN Account → Review and run the matching script → Verify SSTP → Copy Router IP for ISPbills → Add Router → Enter API port and management credentials → Submit → Verify API access → Optionally verify WinBox.
The tunnel solves a reachability problem. Routing, certificate validation, firewall policy, permissions, and subsequent integration checks make the connection suitable for operational use.