MikroTik IP Firewall
Create and manage RouterOS filter and NAT rules from the MikroTik monitor
Create and manage RouterOS filter and NAT rules from the MikroTik monitor
On this page
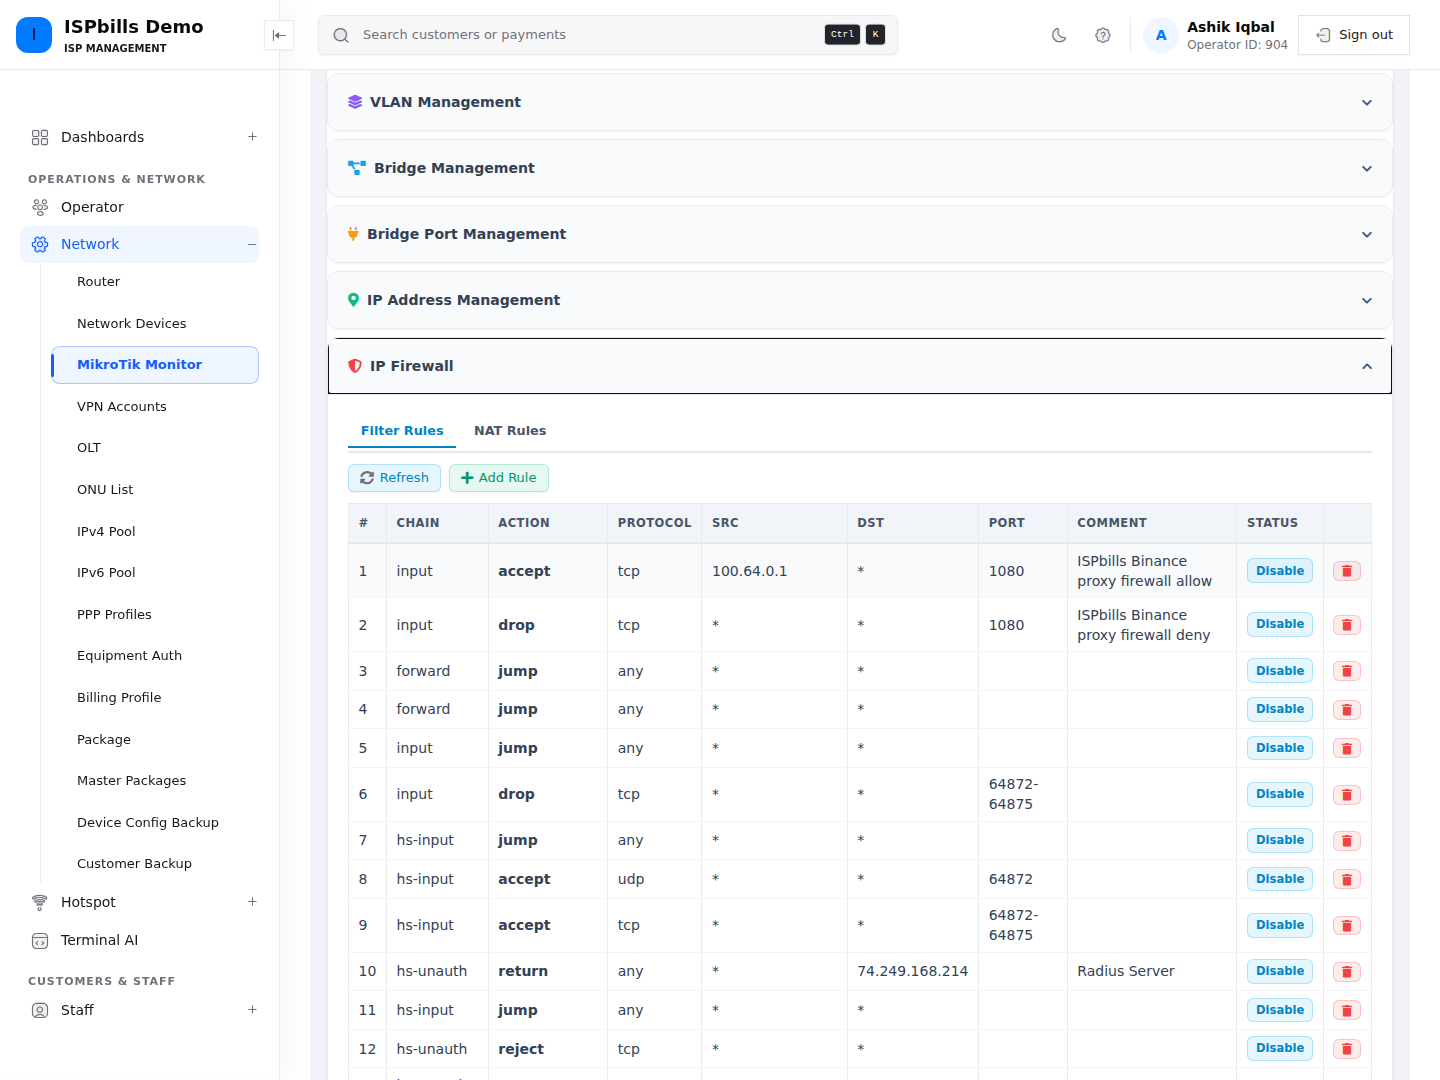
The IP Firewall panel has Filter Rules and NAT Rules tabs. It reads and changes the selected router’s live /ip/firewall/filter and /ip/firewall/nat configuration.
See MikroTik Device Management for access, API, audit, and NOC requirements.
Firewall changes apply immediately and the page has no rollback, safe-mode session, rule reordering, or automatic management-access protection. Check rule order and keep an alternate route to the router.
Filter rules
The table shows order number, chain, action, protocol, source, destination, destination port, comment, and enabled/disabled control.
Add a filter rule
- Open Device Management → IP Firewall → Filter Rules.
- Click Add Rule.
- Set the fields, then click Add Filter Rule.
- Approve the confirmation prompt.
| Field | Allowed by the page |
|---|---|
| Chain | forward, input, or output in the selector. Required; maximum 32 characters at the server. |
| Action | accept, drop, reject, log, passthrough, jump, or return. Required. |
| Protocol | Optional text, maximum 16 characters. |
| Src Address, Dst Address | Optional text, each maximum 64 characters. |
| Dst Port | Optional text, maximum 32 characters. |
| Comment | Optional text, maximum 128 characters. |
Blank optional match fields are not sent and therefore behave according to RouterOS defaults. The form does not expose source port, in/out interface, connection state, address list, ICMP options, jump target, logging prefix, or rule placement.
The page validates lengths and the action list, but does not parse address, protocol, or port syntax. RouterOS decides whether a combination is valid.
Enable, disable, or remove a filter rule
Click Disable or Enable in the row to change its RouterOS disabled state. This toggle has no confirmation prompt and is available to a permitted NOC user.
On a non-NOC management page, use the trash icon and approve the traffic-impact warning to permanently remove the rule. NOC users have no filter-rule delete route.
The page does not expose editing or reordering. Disable a rule for a reversible test; use RouterOS for field changes or ordering.
NAT rules
The table shows chain, action, protocol, destination address/port, translated address/port, comment, and removal control. The create form also accepts a source address, although that value is not displayed in this table after creation.
Add a NAT rule
- Select NAT Rules and click Add NAT Rule.
- Set the fields below.
- Click Add NAT Rule and approve the confirmation.
| Field | Allowed by the page |
|---|---|
| Chain | Required: srcnat or dstnat. |
| Action | Required: masquerade, dst-nat, src-nat, redirect, netmap, accept, or drop. |
| Protocol | Optional text, maximum 16 characters. |
| Src Address, Dst Address | Optional text, each maximum 64 characters. |
| Dst Port | Optional text, maximum 32 characters. |
| To Addresses | Optional text, maximum 64 characters. |
| To Ports | Optional text, maximum 32 characters. |
| Comment | Optional text, maximum 128 characters. |
RouterOS performs the final compatibility checks between chain, action, protocol, ports, and translation targets.
Remove a NAT rule
On a non-NOC management page, click the trash icon and approve the traffic-impact warning. The page does not offer NAT enable/disable, editing, or reordering. NOC users can create NAT rules but cannot remove them from the NOC route set.
Router-wide policies
Beyond adding individual rules, the router action menu can toggle router-wide policies — small, pre-built bundles of firewall (and NAT) rules that enforce a common network policy across every customer behind the router.
Where to find them
Open the MikroTik Monitor, select a router to reach its dashboard, then open Actions → MikroTik policies. Each policy is a one-click toggle.
This menu is Group Admin only and is shown only to the router owner — the group admin whose account owns the router. A NOC operator does not see it, and any other admin receives a permission error.
How the toggle behaves
- Clicking a policy asks for confirmation, then flips it: if the policy’s rules are already present on the router they are removed, otherwise they are applied. A success or failure message is shown on the routers list.
- The router itself is the source of truth. There is no database flag; the system decides whether a policy is on by looking for its own tagged rules on the live router. Every managed rule carries a comment tag beginning with
ispbills_policy_, so you can recognise them in RouterOS. - Applying a policy edits the live
/ip/firewallconfiguration immediately. If any single rule in a bundle is rejected, the whole bundle is rolled back automatically so the router is not left half-configured. - Every enable/disable is recorded in the group’s activity log.
Available policies
| Policy | What it does |
|---|---|
| Block Connection Sharing | Drops forward traffic whose TTL is exactly 63 or 127. A directly-connected device arrives with its default TTL (64 or 128); a customer-owned NAT router decrements it by one, so these values identify shared devices. A heuristic, not a guarantee. |
| Block Hotspot Tethering | Uses the same decremented-TTL signal (drop forward TTL 63/127) under a separate tag to block a line re-shared through a phone or device hotspot. Enabling it alongside Block Connection Sharing is redundant but harmless. |
| Block Torrent / P2P | Adds a Layer7 BitTorrent signature and drops forward traffic matching it, plus drops TCP and UDP on the default torrent port range 6881-6889. Layer7 matching is CPU-intensive on busy edge routers. |
| Force DNS + Block Bypass | NAT-redirects customer DNS (TCP and UDP port 53) to the router’s own resolver and drops DNS-over-TLS (TCP port 853) so clients cannot silently route around it. The router must run a DNS server that allows remote requests, or client name resolution will fail. |
These policies change live firewall rules. They apply to all traffic forwarded through the router, so validate the effect on a small scope first and keep an alternate route to the device.
Troubleshooting and safe recovery
- Before adding
droporreject, identify the management traffic and rule order that keep the router reachable. - If a destination port rule is rejected, verify that its protocol and action support that field.
- If a new rule has no effect, inspect its position and counters in RouterOS; this page does not show counters or move rules.
- If the wrong filter rule was added, disable it first when possible. If the wrong NAT rule was added, a Group Admin must review and remove it because the page has no NAT toggle.
- If a permitted NOC user receives a failure after clicking a trash icon, the missing NOC delete route is the cause; creation and filter toggling remain available.